Friday, October 31, 2014

friday favourites

Hello!

Happy Halloween!

Click here to see Mariana's SPOOKTACULAR card!


It's time for another Friday Favourites!


I wish we had a fire place...so darn cozy! :)


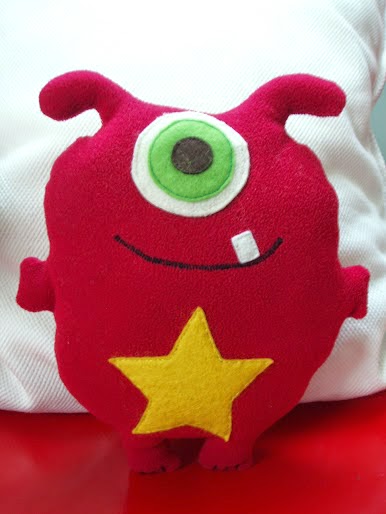
How stinkin ADORABLE is this! Made by my friend Amy who is FAB...and yes...it's a much need reminder to appreciate everything! I LOVE this!!


I need to get myself some yarn to make some cowls...hopefully I can make some for Christmas gifts!


It's been forever since I've made some chocolate chip muffins....came across this recipe which includes bananas, oats and greek yogurt! hello!


Have a fun and safe Halloween and great weekend!
xo
Pin It!

Thursday, October 30, 2014

inspired

Hello!
Hope all is well!
On instagram I came across one of Kristina's cards that inspired me to create something similar but with markers. I will do a little photo tutorial on how I did this and post it on Saturday!


Bye for now!
xo

Pin It!

Wednesday, October 29, 2014

Marin's room

Hello!

Some of you will remember my blog post about Klara's bedroom...and I promised to share her brother's room so here it is! .)


Marin's bed, closet, star light, and rug are all from Ikea.


And just like in Klara's room there's a lot of diy, from the some of the pillows to the wall art.


And just look at this awesome frame Marin created in daycare! Just look at that face!


I said it before and I'll say it again...you can never have enough pillows! ;)


This personally is my favourite spot in his room....I LOVE this rocking chair!


Marin's room is still a work in process but there's loads of inspiration already...hope you're inspired...I am!! I have the need to create a monster theme stamp set! :)


If you want more inspiration pop on over to the JD blog and check out Marion's adorable card using my Doodle Flowers stamp set!
xo


Pin It!

Tuesday, October 28, 2014

Logona Double Lip Pencil

 Hi!

If you're just interested in who won my little giveaway then click here! :)

Last week or so I discovered a new 'green' shop called Green. LOL. I stopped in to take a look and of coarse couldn't leave without buying some kale chips. Might I just add that the women working in the shop were super friendly and full of info...and I got some samples to try out.

I've always been green...I mean I do my best. And I've been switching my cosmetics to natural, green ones so when I saw the Logona cosmetics section in the shop I had to give something a try.


And that something is the Double Lip Pencil in shade 01 Bronze. To be honest the only negative thing I have to say about this product is the name...Bronze...really there's nothing bronze about it in my opinion. I find it to be a mauve colour which is perfect for everyday...your lips but better.

Here's a little info I found...click here for the ingredients.
'This excellent lip pencil is made with the finest natural ingredients in order to care for and pamper the sensitive skin of your lips. It is rich in botanical oils such as castor oil, shea butter and waxes such as beeswax, carnauba and candelilla. These natural oils help to moisturize your lips and keep them soft, supple and healthy so that they will look youthful and beautiful. Our Logona Double Lip Pencil also contains anti-aging organic botanical ingredients including brown algae, apple seed extracts and cranberry seed oil.'


As you can see from the swatches on my arm it's pretty close to Revlon's Mauve It Over (which is one of my favourite lipsticks and have been on the search for a 'green' dupe) especially the lighter shade of the Double Lip pencil.
So one side of the pencil is a shade lighter than the other. It goes on smooth, no drying on my lips and lasts long (as you would expect from a pencil). I would say both shades are satin/matte which I prefer....do not give me lip gloss...I can't stand the feeling of lip gloss on my lips!

I tried to photograph myself wearing it and I just don't know how to take a selfie...the angle is always unflattering...like looking up my nose or something so the arm swatch it is. :)
I love this product and will be checking out the other shades available.


Now....if you need a little crafty inspiration pop on over to the JD blog and check out an adorable card I blog spotted using my Hello Friend stamp set.

xo
Pin It!

Monday, October 27, 2014

Creative Blog Hop

I tagged Jen!

Edit: And the winner is....

Random Integer Generator

Here are your random numbers:
11
Timestamp: 2014-10-28 13:34:50 UTC


11. frommycraftroom said...
Thanks for sharing some more about yourself and your creative process. 
I'll keep my eyes open for the sheep :)
I understand the felting wool will shrink in hot water and fibres will become like a piece of felt fabric - someone correct me if I'm not right.
Congrats frommycraftroom! Email me at janebeljo@yahoo.ca and thank you to all who commented! :)


Hello!

I hope you all had a lovely weekend! :)

The wonderful and super talented Ange tagged me for the Creative Blog Hop and I'm quite flattered that she thought of me! :)
So here we go!


1.What creative projects are you currently working on?

I'm currently and always working on new stamp set ideas...here's a peek of one of my sketches for an up coming set! :)


It's all about sheep and wool for me this month! ;)

I've got many projects on my to do list which includes lots of crochet projects. I bought this yarn (100% wool) thinking it would be perfect for a scarf but when I got home and read the label it said Felting wool and I'm thinking it's not a good idea for a scarf (I'm pretty sure something happens to the wool once washed)...so I decided to make a little added cushion for my chair (at my desk)...I have just enough yarn to make it...keep my butt warm! :)


I'm doing the bean stitch.


2.What inspires your designs?

Many things inspire my designs (I'm talking about my stamp sets)...my kids, nature, even my design team. I had former DT member Amy in mind when I did Life is Good (she loves mason jars...at least she did back then when I drew it), Doodle Flowers ll I had Aga in mind and Hello Friend was inspired by my kids. This also applies for my card making...other card designers, pinterest and home decor magazine give me loads of inspiration.


3.What method / process (if applicable) do you apply to each of your creative projects, and how long does each project take to complete?

I don't even know how to answer this...I don't have a method. I have a vision in my head and I try to recreate it. Is that a method? :) One thing I do though is when I just have no mojo I will stamp a bunch of images and colour them (colouring relaxes me like crocheting does) and then when I do have an idea it really comes in handy having pre coloured stamped images all ready to be used.


4.If you had to describe your 'signature' style, what would it be?

Probably cute. 


5. What are 3 crafting products/tools you can't live without?

Scissors, Graph'it markers and my Fiskars cutting board.


So that's it....and now I'm in trouble! Everyone I have tried to tag has already been tagged!!! I am still looking and will update here on this post who the next crafter is.
Also I wanted to do a little giveaway...


I chose to give TEArrific to giveaway because Ange created an awesome card for the JD blog today using this set. So if you'd like to win this set leave a comment and I'll announce the winner tomorrow! :) Good luck!
xo
Pin It!

Saturday, October 25, 2014

free digi - pumpkins

Hello!

Hope you all are enjoying your weekend! :)
It's getting colder here in Zagreb...literally over night! Feeling more like autumn. While I was browsing pinterest I noticed pumpkins everywhere, from decor, diy and recipes!! So I drew up these pumpkins for anyone who's interested! :)


Right click and save!


Have a great day!
xo

Pin It!

Friday, October 24, 2014

friday favourites

Hello!
Happy Friday! :)


Black and white seem to be the theme of my Friday favourites. 


 Yup! He is THE ultimate designer!!


Don't you love those long lazy mornings....ahhh....sigh.....


It's pumpkin season and Halloween is around the corner (we don't celebrate Halloween here in Croatia). I just love this idea!


I want to crochet a black and white blanket for my bedroom....I'm gonna need a lot of yarn!!!!!!


Have a great weekend!
xo

p.s. pop on over to the JD blog and check out Angeline's SWEET tag! :)

Pin It!

Thursday, October 23, 2014

warm wishes + stretch your stamps


Hello!

Hope all is well!

I'm going to show how I stretched my stamps with a little masking. I used the bunny and chick from my Spring stamp set to create a Christmas card by adding the snowman's hat (from my Warm Wishes) stamp set and drawing a hat on the chick.


For the chick I took some washi tape (post-it's are great for this too...I usually use post-it but ran out of them) and cover the top of the chick's head where I want to draw the hat. Draw the hat with a pencil first than trace over it with a marker and erase the pencil.


Ink up the stamp, remove the washi tape and stamp.


I did the same with the rabbit. 


I too the snowman stamp from my Warm Wishes stamp set and masked off everything but the hat, after I inked the hat and took off the washi tape I rubbed off the ink where I wanted the ears to be with a baby wipe.

Don't worry if it doesn't look perfect...once you colour it those little mistakes won't show. Also you can fix any lines (if they didn't stamp clear) with a marker (I use Sakura Pigma Micron) and use a white gel pen to erase any tiny mistakes.


Again, same thing with the ears....


I embossed polka dots on the vellum to create the snow...I adhered the sides of the vellum at the back so the glue doesn't show through at the front.


I coloured my images with Graph'it markers and as you can see any tiny imperfections are gone once coloured in. 


Have a great day!
xo

Pin It!

Tuesday, October 21, 2014

snow much fun

Hello!
Hope all is well!


On pinterest I noticed the talented Laura's card and immediately  wanted to recreate it using my  Warm Wishes stamp set (thanks Laura for the inspiration).

So for this card I cut out my card base and then I trimmed down (so that it's a bit smaller than my base) white cardstock and used my circle die to cut out my window. I cut blue cardstock to fit under this 'window'.  I haven't used my SRM stickers in a while so I found this cute sentiment.


I cut two strips of velum to use as snow.


Adhere the velum and trim off the sides that are sticking out. Then adhere the window. onto the blue cardstock.


Adhere the 'window' to the card base, add the sentiment and snowman (which I coloured with my Graph'it markers).


Now while this is cute I thought the snowman would be happier with company so I added the bird and the present (which is from my Mr. & Mrs. Claus stamp set).


I had this stamped image already coloured from a couple of days ago and decided to use my scraps from the card above to create a mini tall card...if you will! ;)
I used my Warm Wishes and Mr. & Mrs. Clause stamp sets.


Have a great day!
xo


Pin It!